

How To Set Up Visual Studio Code For Java
For years, Java development has been dominated past the big three IDEs: Eclipse, InelliJ IDEA, and NetBeans. Just we have other good options. Amidst the big field of generalized, polyglot code editors that have been gaining mindshare, Visual Studio Code has get a standout, and offers impressive Java support. VS Code also delivers offset-class back up of other technology stacks including front-end JavaScript frameworks, Node.js, and Python.
Should Visual Studio Code be your next Java IDE? This article gives an introduction to using Visual Studio Code to build an enterprise Java back end with Jump and connect information technology to a Svelte JavaScript front end.
Ready Bound Kicking
To build along with this tutorial, you volition need to have Java and Maven installed. Y'all will as well need the latest Visual Studio Code distribution for your system, if you don't already have it. Information technology is a simple install process.
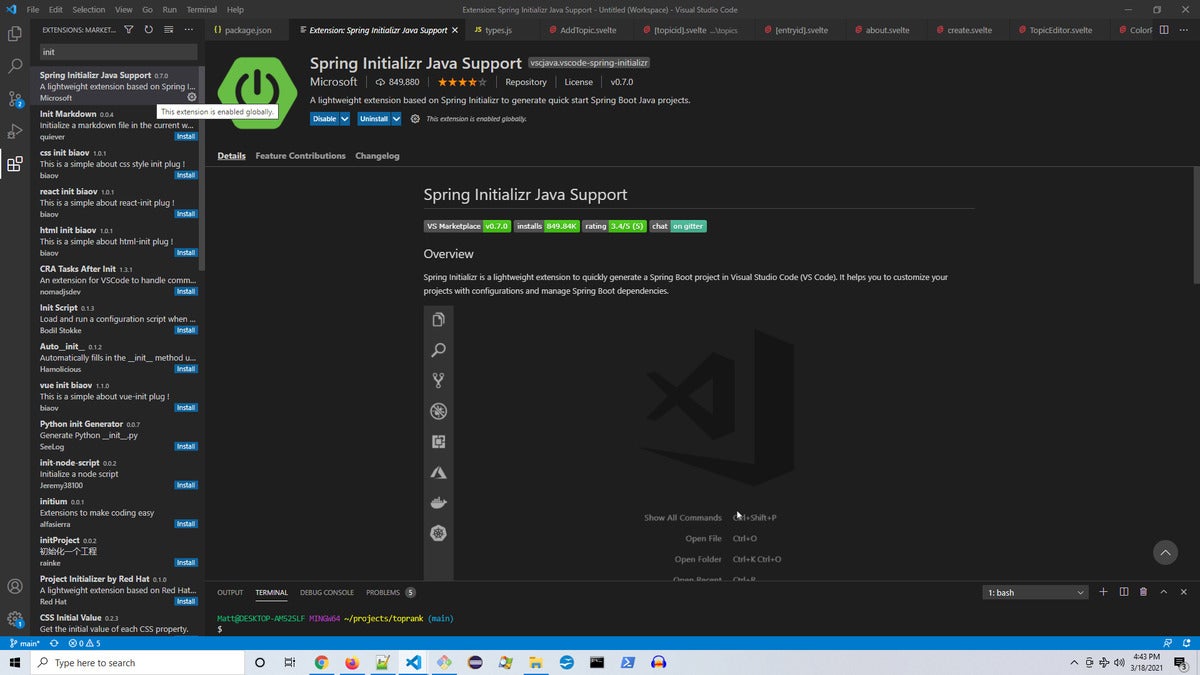
Now let'due south jump correct in with a new project. Yous are going to use Jump Initializr to create a new Leap Boot Web app. Open VS Code and click the extensions icon on the bottom left. This will let you search for available add ons (and there are a lot of them). Blazon in "leap init" and you'll see the Spring Initializr Java Support extension. Install it as seen in Figure 1.
Figure 1. Installing the Spring Initializr extension
 IDG
IDG Figure 1.
Once installed (it won't have long), yous tin can use information technology via the control palette, which is accessible with Ctrl-Shift-P (or View -> Control Palette from the main menu). With the command palette open up, blazon "bound init" and you'll see the newly installed command. Run information technology.
Now follow along with the wizard. Yous can accept nearly defaults like language Java; Java Version 12; artifact id "demo"; group id "com.infoworld"; packaging "JAR"; and the rest. When adding dependencies, add together Spring Boot Web and Bound DevTools. (You tin add more than dependencies later past right-clicking the POM file and selecting "add starters.") You lot'll also select a location for the project; just select a convenient spot on your local drive.
In one case the new project is created and loaded into your workspace, y'all tin can open up a command line terminal by typing Ctrl-Shift-` or choosing Final -> New Final from the main menu.
In the terminal, type mvn spring-kicking:run. The first time you practise this, Maven volition download your new dependencies. When that's washed, the dev server volition be running. You can verify this past opening a browser and going to localhost:8080. You will see a default "non constitute" error page considering we oasis't defined whatever routes yet, but this verifies that the server is upward and listening.
You tin can apace access files by striking Ctrl-Shift-P and typing "Demo" to bring upward the DemoApplication.java file. Open up it, and you'll encounter a typical standalone Jump Boot starter app.
At present nosotros're going to install the Java extension pack, which gives us a variety of features like IntelliSense and context-sensitive resource cosmos. Back in the extensions menu, type "Java extension," and install the Java Extension Pack. Finally, add the Spring Kicking Extension Pack.
Now you lot'll notice when y'all open the DemoApplication.java file, VS Code helpfully offers run and debug commands right in the source file.
Import the Coffee project
Import the Coffee project At this indicate, Visual Studio Code understands Coffee, and will prompt you: "This Project contains Java, do yous want to import it?" Become ahead and choose "Always." Once that is done, VS Code will be able to car-complete and so forth for Java.
Let's add together a REST controller. Open the file view (acme left in the left-side card), correct-click on /src/com/infoworld/demo, and select "New File." Name the file MyController.java. You'll notice the VS Code has stubbed out your course for you as seen in Listing one.
Listing 1. Java stub in VS Code
Listing 1. Java stub in VS Code package com.infoworld.demo;
public class MyController {
} Begin by annotating the class with @RestController. Detect that, with the installed extensions, you accept total automobile-complete support.
Inside the new MyController form, starting time typing "Go..." and you'll get an auto-complete snippet for GetMapping; get ahead and select it. This will create a basic Go mapping that we'll modify, as seen in Listing 2.
List two. Basic Become mapping
List two. Basic Become mapping @RestController
public class MyController {
@GetMapping(value="/")
public String getMethodName(@RequestParam(required = faux) String param) {
return "test";
}
} Now if you open localhost:8080, you'll run into a unproblematic "exam" response. Things are moving along smoothly.
Notice that the server is automatically reloading changes, thank you to Jump DevTools and spring-boot:run.
Create a Svelte front end
Create a Svelte front end At present let'due south open a new terminal — y'all can run terminals side-by-side past choosing Terminal -> Dissever-Concluding. In the new terminal, become to a convenient directory (not inside the Java project) and create a new Svelte front terminate, with the commands shown in Listing 3.
Listing 3. Svelte front-stop scaffolding
Listing 3. Svelte front-stop scaffolding npx degit sveltejs/template vs-java-frontend
cd vs-java-frontend
npm install
npm run dev Now y'all should be able to scan to localhost:5000 and run across the Svelte greeting page.
Add the front end to the workspace
Add the front end to the workspace Next, right-click in the file explorer, nether the Demo project, and select "Add folder to workspace." Navigate to the front-stop project we simply created with Svelte. That will add together the front finish to VS Lawmaking equally role of the project workspace, then we can edit it.
Now add the Graceful for VS Code extension to VS Code using the same process as when you added the Coffee extensions to a higher place. In one case the extension is installed, VS Code will be able to handle both the front end-stop JavaScript framework and the back-finish Coffee.
Connect the forepart and back ends
Connect the forepart and back ends We tin test the front-end communication to the dorsum cease by using Ctrl-Shift-P to open the app.graceful file and modifying the script element to look like List iv.
Listing 4. Hit the dorsum cease
Listing 4. Hit the dorsum cease <script>
export let name;
async office loadData(){
let response = await fetch("http://localhost:8080");
name = await response.text();
}
loadData();
</script> Listing iv runs a role that fires a unproblematic Become request to our back-end endpoint and puts the response into the name variable, which is then reflected in the markup.
Java runtime configuration
Java runtime configuration To get information about and configure your Coffee runtime, y'all can open the control palette (Ctrl-Shift-P) and open "Configure Java runtime." You'll exist presented with a screen like Figure ii.
Figure 2. Configuring the Java runtime
Figure 2. Configuring the Java runtime  IDG
IDG Figure ii.
Notice that VS Code has detected your installed JDKs and adamant which projects are using which version. It also allows yous to install new version from within the IDE.
Debugging the Java
Debugging the Java Debugging your Coffee in VS Code is also uncomplicated. Stop the demo app if information technology is running. Correct-click on the DemoApplication file and select Debug. Spring Kick will run in debug style.
Open MyController and double click on the red dot to the left of line fourteen to set a intermission point. Now reload the localhost:5000 page. The breakpoint will take hold of and yous'll see a screen like Effigy 3.
Figure 3. Debugging a Java file
Figure 3. Debugging a Java file 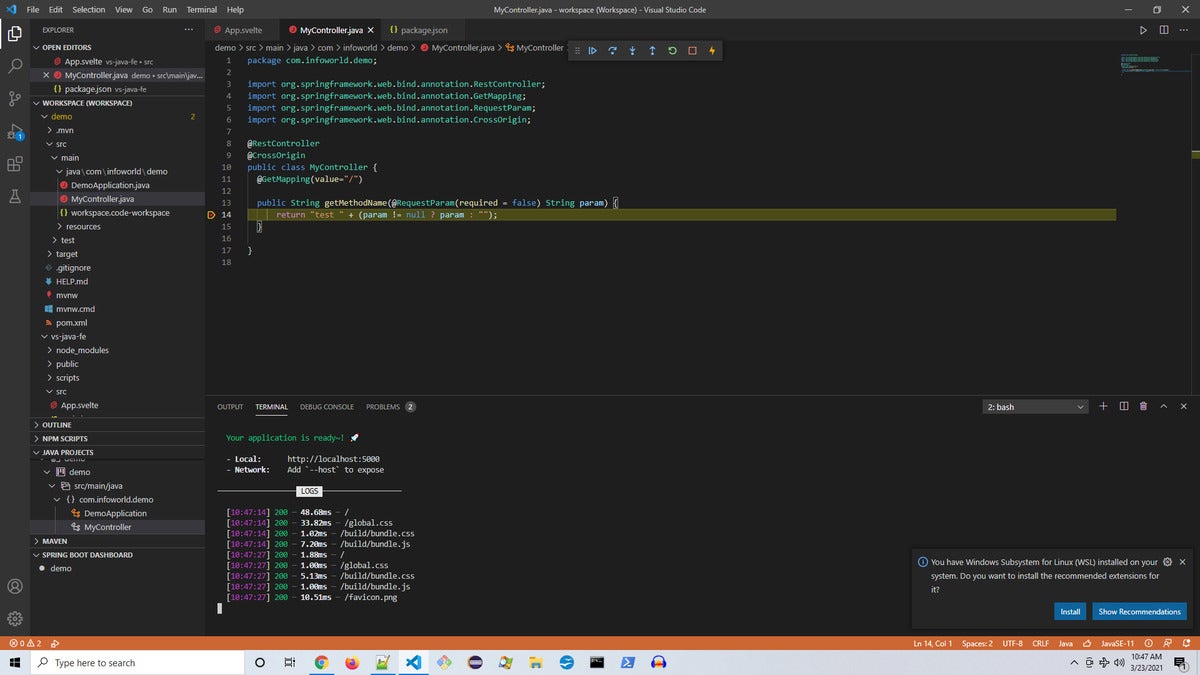 IDG
IDG Figure 3.
Notice the menu bar allows yous to keep, step into, step over, etc. You take full code debugging capabilities from hither, including the ability to get variable land and run commands from the debug console at the bottom.
Running tests
Running tests Now open the DemoApplicationTests.java file, which was created by Spring Initializr. Notice there is a "Run tests" open. Click this. (Yous can too right-click the file and cull "Run Coffee.")
The tests will run and a checkmark will go available — this allows yous to view the test run results, as seen in Figure iv.
Effigy 4. Viewing JUnit results
Effigy 4. Viewing JUnit results  IDG
IDG Effigy 4.
Saving the workspace configuration
Saving the workspace configuration When you close VS Code, information technology will prompt yous to save the workspace configuration, suggesting a name of workspace.code-workspace. Save the config, and when you open the project again, you will find all of your settings in place.
VS Code for Java
VS Code for Java The Java capabilities constitute in Visual Studio Code are comparable to those in the more traditional Coffee IDEs, with the right extensions installed. The deviation: VS Lawmaking tends to exist more lightweight and responsive, and things usually just work with a minimum of fuss.
This speed and ease combined with the ability to seamlessly utilize other engineering stacks — meaning you don't have to shift gears to a new environment or wrangle with configuration — make VS Lawmaking a compelling option for Coffee development.

How To Set Up Visual Studio Code For Java,
Source: https://www.infoworld.com/article/3619031/build-a-java-application-in-visual-studio-code.html
Posted by: wasingerteld1997.blogspot.com
0 Response to "How To Set Up Visual Studio Code For Java"
Post a Comment